Paper screening tool for systematic review: a beginner’s step-by-step guide
Beginner-friendly guide to paper screening for systematic reviews: essential features, a first workflow, and Study-Screener vs Rayyan vs Covidence with PRISMA 2020 in mind.
Starting your first systematic review can make screening feel daunting. You may have thousands of records and a deadline. A paper screening tool turns that pile into a clear, trackable workflow.
This guide keeps the language simple. It covers what a screening tool does, which features matter for beginners, and how to set up your first project step by step. You will also see a quick comparison of popular tools (Study-Screener, Rayyan, Covidence) and a short FAQ.
Method note and disclaimer:
- Follow PRISMA 2020 for reporting and transparency.
- Use a written protocol (even if brief). The tool helps you follow your plan. It does not replace a method.
- When in doubt, check trusted guides like the Cochrane Handbook and JBI manuals.
References:
Tip for the full review lifecycle:
- For help at the search/protocol stage (before screening), see SystematicReviewTools.app for a curated overview of tools.
- For building your search strings, try the SRT Search Builder.
- For data extraction after screening, move to an evidence table tool such as EvidenceTableBuilder.com.
These links keep your workflow connected: protocol and search → screening (Study-Screener) → evidence table and synthesis.
What is a paper screening tool and why you need one for a systematic review
A paper screening tool helps you decide which studies belong in your review. It presents each record (typically title and abstract first; full text is often assessed in a separate pass, sometimes outside the same screen) and lets you mark include or exclude with reasons. It tracks who made each call, flags conflicts, and helps you document counts for a PRISMA flow diagram.
Common screening stages:
- Title/abstract screening (first pass): Quickly exclude obviously irrelevant records by reading titles and abstracts.
- Full-text screening (second pass): Read the full PDFs to make final include or exclude decisions with clear reasons (e.g., wrong population, wrong outcome).
Why a tool helps:
- Time savings: Keyboard shortcuts, bulk actions, and filters speed things up compared with a plain spreadsheet alone.
- Fewer errors: Removing duplicates before you import (for example in your reference manager) prevents double-counting. An audit trail keeps decisions tidy.
- Team coordination: Dual independent screening with blinded conflict resolution reduces bias and improves consistency.
- Easy reporting: PRISMA-oriented exports or diagram tools, plus structured data exports, simplify write-up and peer review.
A good screening tool does not decide for you. It supports clear, consistent decisions and solid documentation.
Key features first-time reviewers should look for (checklist)
Use this checklist to compare options. New terms are explained as you go.
-
Import formats and deduplication
- In Study-Screener, uploads are RIS (most common) or PubMed/MEDLINE-style .txt exports. Other formats (EndNote XML, CSV, BibTeX) should be converted to RIS in Zotero, EndNote, or similar before import.
- Deduplicate before import: merge database exports and remove duplicates in your reference manager (or a dedicated dedupe tool), then upload a single cleaned file. Record how many duplicates you removed for PRISMA.
- A clear import validation step so bad files fail early, rather than halfway through screening.
-
Dual independent screening with blinding
- Two reviewers screen the same records independently (recommended by PRISMA and Cochrane).
- Blinding means each reviewer does not see the other’s decision until both decide. This reduces bias.
- A simple workflow for a third reviewer to resolve disagreements after blinded screening.
-
Easy tagging, bulk decisions, and reviewer roles
- One-click Include, Exclude, and Maybe buttons with shortcut keys.
- Preset exclude reasons plus a custom reason field when the built-in list is not enough.
- Bulk actions for batches of records when your protocol allows (for example obvious excludes).
- Roles: project owner (creates the project, invites others) and reviewers. Agree who acts as the third reviewer when two people disagree; that person is not always a separate software “role.”
-
PRISMA flow export, audit trail, and data exports
- PRISMA 2020 flow: generated from AI screening results when you use that workflow, or built manually using Study-Screener’s PRISMA diagram tool with your stage counts. Manual title/abstract screening exports RIS and CSV (including a decision log); open CSV in Excel if you like.
- Complete audit trail: who made which decision and when (where the product stores decisions and notes).
- RIS exports import cleanly into reference managers; CSV carries decisions and notes for downstream tools and evidence tables.
-
Usability for beginners
- Friendly onboarding and built-in tutorials.
- Clean interface with filter-by-stage and “next record” navigation.
- Multi-user collaboration with invitations and permissions.
-
Optional: AI-assisted screening (know the limits)
- Study-Screener can run AI-assisted screening on your criteria so you review suggestions and rationales faster than line-by-line manual entry alone.
- Use AI as an assistant, not a judge. Humans still make final decisions.
- Keep a human in the loop and document any AI settings in your methods.
-
Security and access
- Email/password or ORCID sign-in (check the live site for the latest options).
- Clear data export and ownership terms so you can move your data later.
-
Support and learning resources
- Documentation, tutorials, and email support (see the site for what is offered on your plan).
- Templates for inclusion criteria and reasons.
If you later move to data extraction, you will want your screening export to flow cleanly into an evidence table builder. CSV and RIS exports from Study-Screener import well into EvidenceTableBuilder.com (an “evidence table” is a structured summary of included studies).
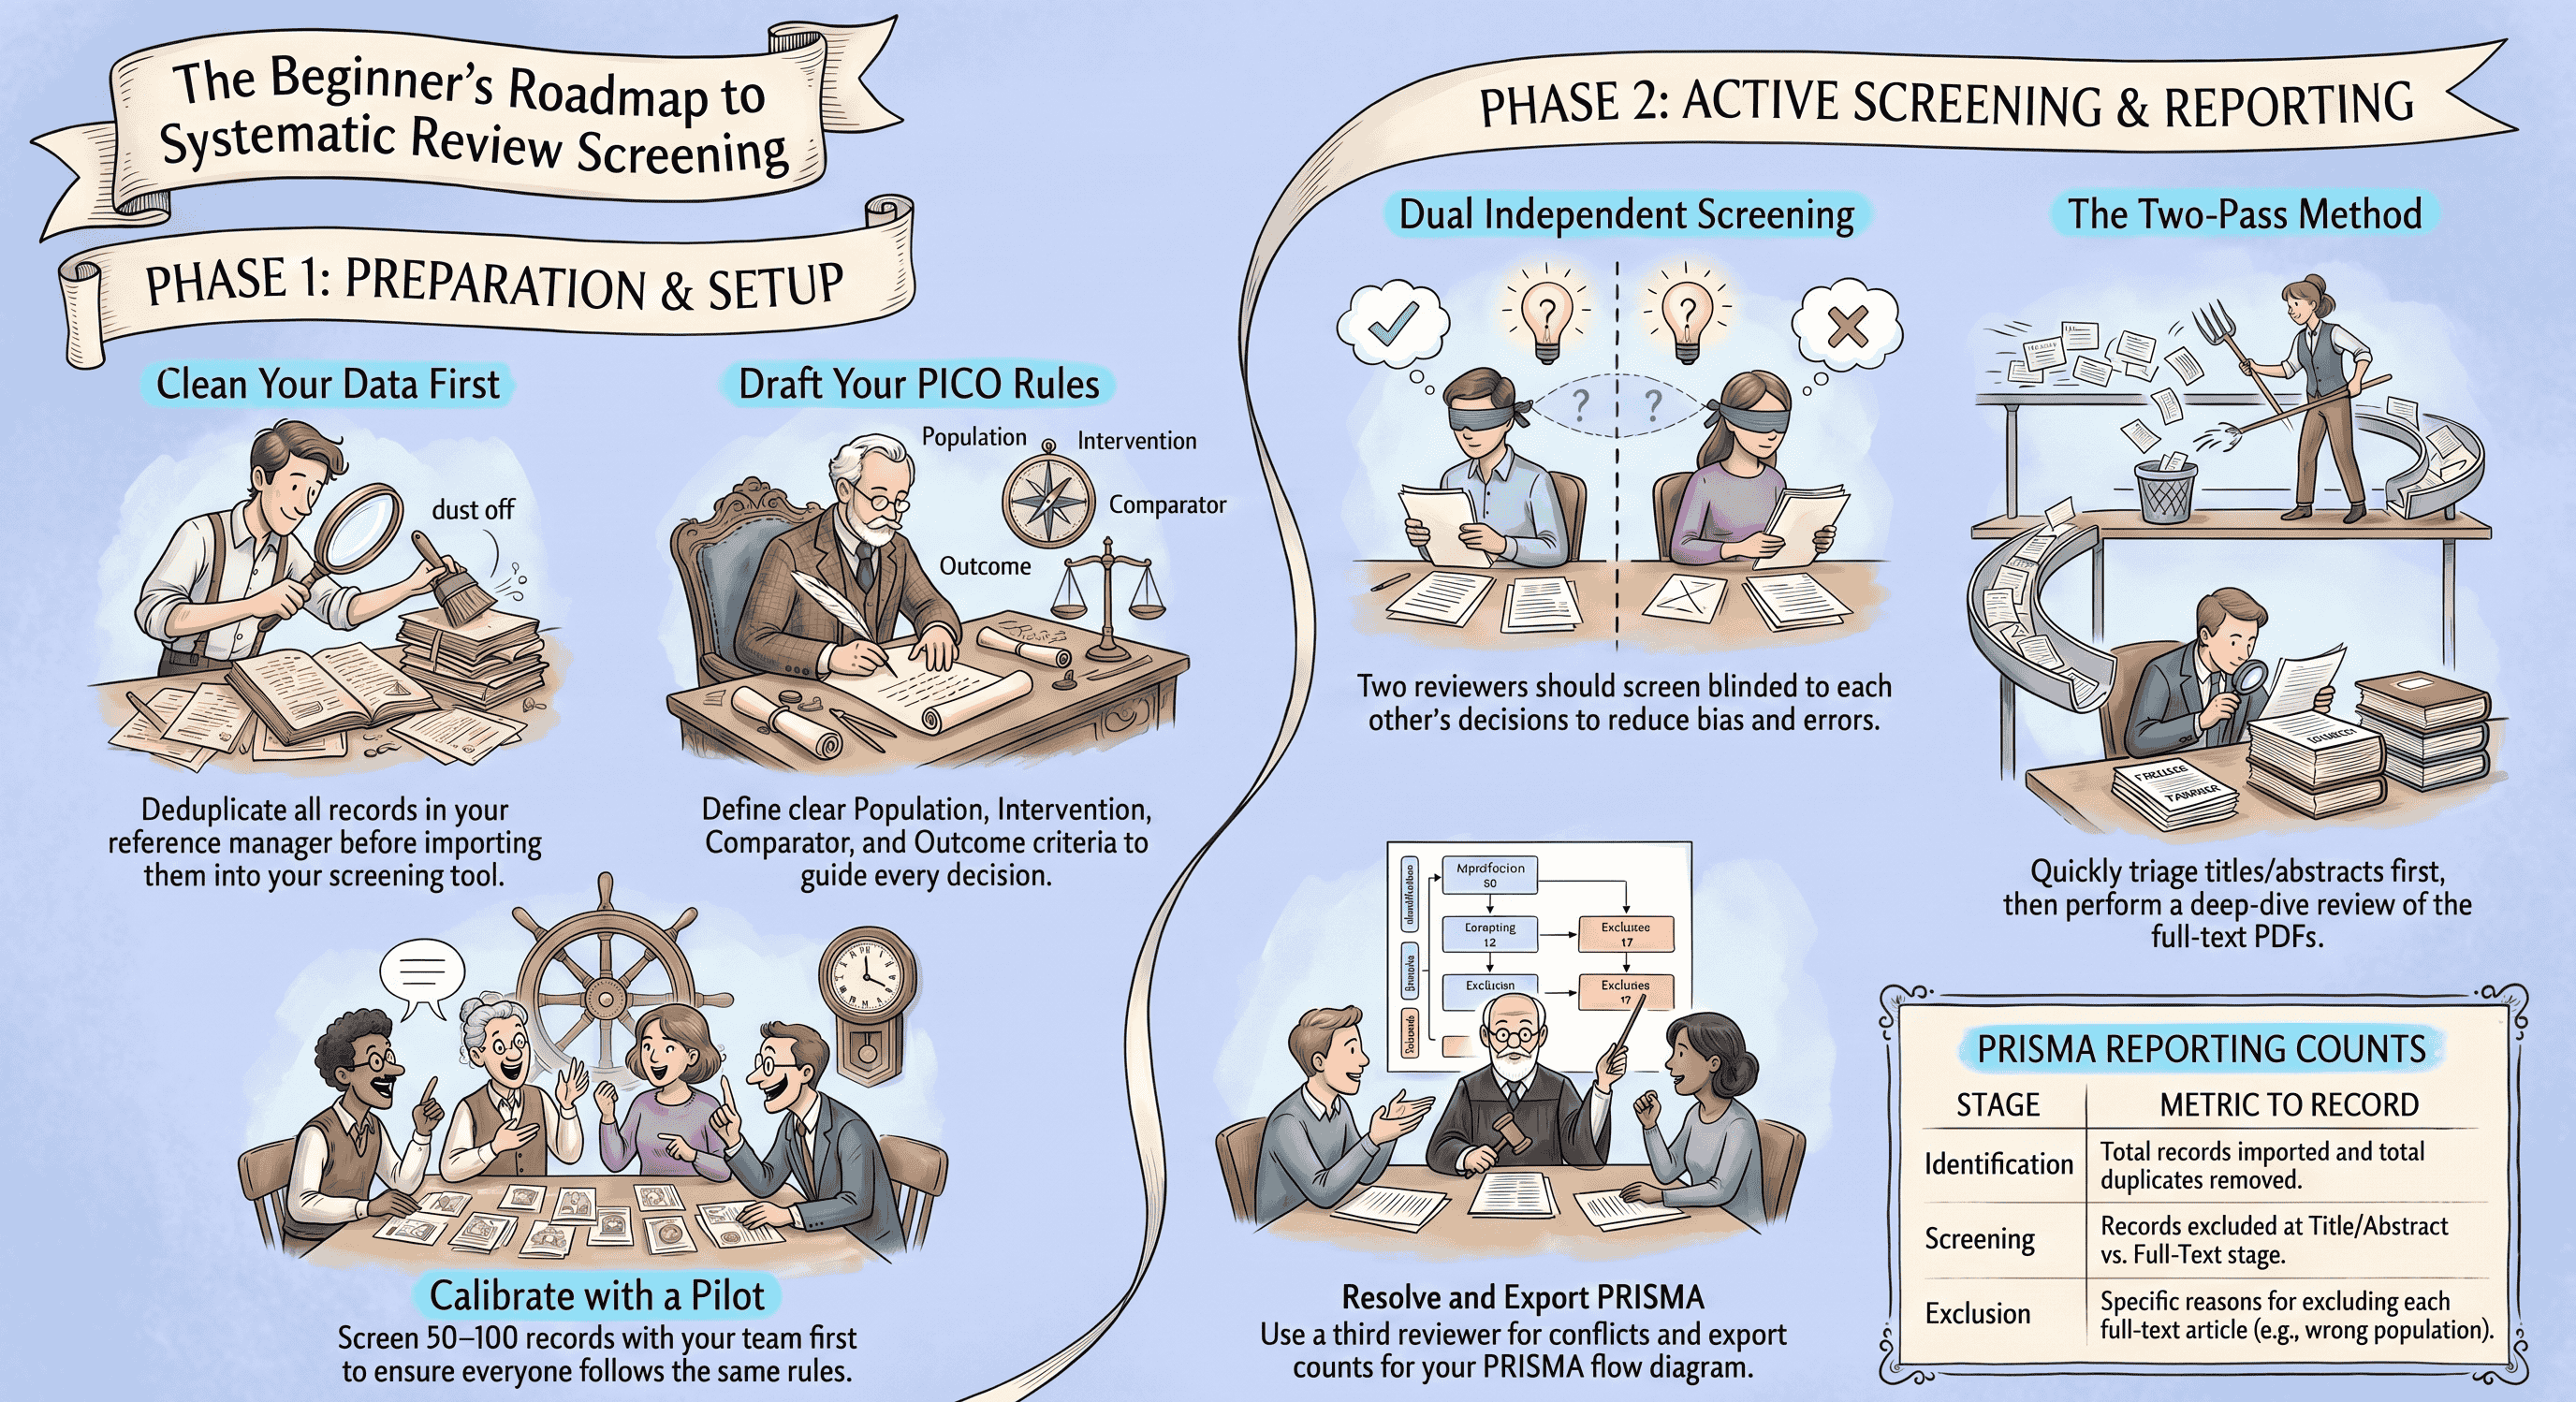
How to set up and run your first screening project (step-by-step)
Use this step-by-step plan to launch your first project in Study-Screener. You can adapt the steps to other tools, but the screenshots and buttons in our app follow this order.
- Finalize your question and criteria
- Write your PICO (Population, Intervention, Comparator, Outcome) or your review question.
- Draft simple include and exclude rules (e.g., RCTs only; adults 18+; English; outcome includes HbA1c).
- Keep your rules visible as you screen (for example a second window with your protocol, or PICO terms you are highlighting in the abstract).
- Prepare and import your search
- Run your searches in databases (e.g., PubMed, Embase).
- Export each set as RIS, or use PubMed’s MEDLINE text export saved as .txt if that is what you use. Merge and deduplicate externally, then export one combined RIS (recommended) for upload.
- In Study-Screener: create a project and import one file per create flow (merge multiple database exports first if needed).
- Tip: Capture your search strings and run dates. You will need them for PRISMA methods reporting.
- Not sure how to build searches? See SystematicReviewTools.app for search guidance and try the Search Builder.
- Deduplicate (before upload)
- Remove duplicates in your reference manager or citation tool before you upload to Study-Screener.
- Keep the most complete record per article (often the one with a DOI and abstract).
- Log how many duplicates you removed. You will enter that number into your PRISMA diagram or reporting table.
- Decisions and exclusion reasons
- Study-Screener uses Include, Maybe, and Exclude for title/abstract-style triage. There is no separate “settings” screen to rename those decision types.
- For Exclude, pick a preset reason where it fits, or type a custom reason so your log stays PRISMA-friendly.
- For full text, many teams track exclusion reasons in the same decision log or in their protocol appendix; align wording with what you will report in PRISMA.
- Assign reviewers and enable blinding
- Add team members by email so everyone works on the same project library.
- Agree that two reviewers screen the same records independently (recommended by PRISMA and Cochrane).
- Turn on blinding so reviewers do not see each other’s votes until both have decided (or until your team unblinds for resolution, following your protocol).
- Calibrate with a small pilot
- Pick 50–100 records. Have both reviewers screen them independently.
- Meet to compare decisions. Discuss unclear cases and revise your criteria notes.
- Optional: Track simple agreement (percent agreement). For advanced teams, calculate kappa. For beginners, aim for clear, shared rules.
- Run Title or Abstract screening
- Use keyboard shortcuts (e.g., I = include, E = exclude, M = maybe).
- Use filters to batch obvious excludes (e.g., wrong study design).
- When in doubt, choose Maybe. It is faster to triage now and decide later on full text.
- Check progress weekly. If conflicts are high (>20–25%), pause to adjust rules.
- Resolve conflicts
- Use the conflicts filter (or your team’s conflict list in My Library) so the agreed third reviewer opens each disputed record and chooses Include or Exclude with a reason.
- Keep notes on any edge cases and how you handled them. This improves consistency.
- Move to full-text assessment
- Obtain PDFs outside Study-Screener (library access, interlibrary loan, author requests). The in-app workflow is built around title and abstract metadata, not in-product PDF markup.
- Apply your full-text exclusion reasons and record the primary reason for each exclusion for PRISMA.
- Keep a log of “Studies awaiting classification” if you cannot obtain a PDF in time.
- Export PRISMA-ready counts and screen-ready datasets
- PRISMA diagram: use the AI screening export path if you ran that workflow, or open Study-Screener’s PRISMA 2020 diagram tool and enter your counts, then download PNG or SVG (or print to PDF from your browser).
- Data: export included studies as RIS or CSV (CSV opens in Excel). Use the decision log CSV when you need who decided what and when.
- Next step: Build your evidence table in EvidenceTableBuilder.com.
Quick checklist for PRISMA-compliant documentation during screening:
- Save database names, search strings, and run dates.
- Record counts at each stage: total imported, after dedupe, title or abstract excluded, full text assessed, full text excluded with reasons, included.
- Keep an audit trail of who screened and resolved conflicts.
- List all exclusion reasons used at full text with counts.
- Note any automation tools (for example AI-assisted screening) and how you used them.
Quick comparison: Study-Screener vs Rayyan vs Covidence (what beginners should know)
This summary highlights what first-time reviewers care about most: learning curve, collaboration, PRISMA and export features, and support. Always check each site for current pricing and features.
Study-Screener (SS)
- Strengths: Beginner-friendly onboarding, dual screening with blinding, optional AI-assisted screening, PRISMA diagram support (from AI results or manual counts), decision CSV/RIS exports with an audit trail, and straightforward handoff of CSV/RIS into EvidenceTableBuilder.com for extraction.
- Learning curve: Gentle. Good for first projects and student teams.
- Collaboration: Email invites, reviewer access on shared projects, and conflict resolution from the library or screening filters.
- Exports: RIS, CSV (decision log), PRISMA PNG/SVG (and browser print-to-PDF). RIS is widely portable; use CSV when you need columns for analysis or evidence tables.
- Support: Tutorials, quick-start material, and site-listed contact options.
Rayyan
- Strengths: Popular, quick to start, good for title and abstract triage, basic AI suggestions.
- Learning curve: Quick for the first pass; some limits appear at full-text and PRISMA reporting stages.
- Collaboration: Multi-user. Blinding is available.
- Exports: CSV or EndNote; PRISMA support often needs manual counts or third-party steps.
- Support: Docs and community; direct support varies by plan.
Covidence
- Strengths: End-to-end SR workflow (screening through extraction) with structured forms; well known in academic libraries.
- Learning curve: Moderate; more menus and configuration for new users.
- Collaboration: Strong, with roles and sign-off flows.
- Exports: Good PRISMA support; direct RevMan integrations for some workflows.
- Support: Library partnerships and tutorials; licensing may be needed.
Which to pick if…
- Small team, first project, quick ramp-up: Study-Screener or Rayyan. If you want PRISMA diagrams tied to AI screening counts—or a free-standing PRISMA form—and CSV/RIS that pair with an evidence table tool, Study-Screener is a strong fit alongside EvidenceTableBuilder.com.
- Large team, institutional license already in place: Covidence (check if your library provides access) or Study-Screener for simpler training and faster onboarding.
- Time-limited project with a strict journal checklist: Study-Screener for structured exports, PRISMA diagram support, and a clear audit trail in decision logs.
- Want AI help for first-pass triage: Study-Screener’s AI-assisted screening and Rayyan’s suggestions both need human sign-off; document what you used.
Note: If you plan to do risk of bias soon after screening, browse SystematicReviewTools.app for a quality review tool (risk-of-bias assessment) that fits your methods.
Common mistakes and how to avoid them
-
Skipping deduplication
- Problem: Duplicates inflate counts and waste time.
- Fix: Deduplicate before upload, then record duplicate counts for PRISMA.
-
Not piloting your criteria
- Problem: High conflict rates and inconsistent reasons later.
- Fix: Calibrate on 50–100 records. Update your criteria notes.
-
Single-reviewer screening without safeguards
- Problem: Higher risk of missed studies and bias.
- Fix: Use dual independent screening with a third reviewer for disagreements. If truly solo, consider a second pass on a random sample and report this limitation.
-
Mixing screening with data extraction
- Problem: Scope creep and fatigue.
- Fix: Finish screening first. Then move included studies to EvidenceTableBuilder.com or another evidence table workflow for extraction.
-
Vague exclusion reasons
- Problem: PRISMA requires clear counts by reason.
- Fix: Use a defined reason list. Record the primary reason at full text.
-
Over-relying on AI
- Problem: False negatives if the model is not tuned to your topic.
- Fix: Treat AI as triage or suggestions, not approval to drop records without human review. Spot-check exclusions and review Maybe lists carefully.
-
Poor documentation
- Problem: Hard to write methods and respond to peer review.
- Fix: Keep protocol notes alongside the project, export your decision log CSV, and save search strategies and run dates.
-
No plan for PDFs
- Problem: Full-text stage stalls.
- Fix: Engage your library early. Track awaiting classification items.
Next steps and resources for first-time reviewers
Try a demo project this week:
- Pick a narrow topic (e.g., “vitamin D for falls prevention in older adults”) so you get 300–600 records.
- Create a Study-Screener project.
- Merge exports from at least two databases into one RIS, dedupe externally, then import.
- Pilot 50–100 records with a teammate; turn on blinding; agree who resolves conflicts.
- Run title/abstract screening to completion. Resolve conflicts. Track a short list of records you will take to full text outside the app.
- Export your PRISMA diagram (AI path or manual counts) and export included studies as CSV or RIS for EvidenceTableBuilder.com or your next step.
Helpful resources:
- Search-stage help and tool roundup: SystematicReviewTools.app
- Build and test search strings: SRT Search Builder
- Extract and build an evidence table: EvidenceTableBuilder.com
Downloadable starter template (what to include):
- Project title and question (PICO or similar)
- Inclusion criteria and exclusion criteria
- Databases searched and dates
- Screening roles and blinding settings
- Exclusion reasons (full-text stage)
- PRISMA counts checklist
When to involve a librarian or methodologist:
- Complex topics with many synonyms or study designs (e.g., network meta-analysis).
- You expect >10,000 records or have a tight deadline.
- You need to plan subgroup or sensitivity analyses early.
Simple escalation tips:
- Ask your library for help retrieving PDFs and refining searches.
- If conflicts remain high after calibration, rewrite 2–3 criteria lines in plainer language and add examples.
- For niche topics, consider adding a targeted hand-search or citation chase; then document it.
FAQ: paper screening tool for systematic review
-
What is “dual independent screening” and why does it matter?
- Two people screen the same records on their own, without seeing each other’s decisions. This reduces errors and bias. Disagreements are resolved by discussion or a third person.
-
Can I do a systematic review alone?
- You can, but it is not best practice. PRISMA and Cochrane recommend at least two screeners. If you must work solo, consider having a second person check a sample and report this as a limitation.
-
How fast can I screen?
- Beginners often screen 100–300 title or abstract records per hour once familiar. Full text is slower (10–30 per hour) because you read PDFs carefully.
-
Does AI replace human screening?
- No. AI can suggest decisions and rationales; humans must make final calls, especially for borderline cases. Always document any AI use.
-
What do I export at the end of screening?
- PRISMA diagram files (PNG/SVG or print-to-PDF), CSV decision logs (open in Excel if you prefer spreadsheets), RIS for included references, and a clear list of full-text exclusion reasons with counts for your write-up.
-
How do I handle conference abstracts?
- Follow your protocol. Some reviews include them; others exclude or tag for sensitivity analysis. Create a clear rule and apply it consistently.
-
Do I need a “quality review tool” now?
- Not during screening. Use one later for risk of bias or study quality assessment. Browse options at SystematicReviewTools.app.
-
Can I switch tools mid-project?
- Yes, if you can export decisions and notes. Study-Screener provides CSV and RIS exports that many tools can ingest. Switching midstream can still slow you down, so plan ahead.
Final notes for first-time reviewers
- Keep your criteria simple and visible.
- Calibrate before you go fast.
- Log decisions and reasons. Your future self (and reviewers) will thank you.
- Use your tool’s strengths: dedupe before import, blind screening where appropriate, PRISMA diagrams from AI screening or manual counts, CSV/RIS exports, and a clean handoff to EvidenceTableBuilder.com when you start extraction.
Study-Screener is built to lower the barrier for PRISMA-aligned screening documentation. If you can import a RIS file and click Include, Exclude, or Maybe, you can run a review. When you are ready to extract data, send your included set (typically CSV or RIS) to EvidenceTableBuilder.com or another evidence table workflow to keep momentum.
Educational notice: This guide offers general best practices for beginners and references PRISMA 2020 and the Cochrane Handbook. Always follow your protocol, your field’s standards, and your target journal’s instructions.
